1. Intro
Immich ist für mich die Lösung, wenn es darum geht, meine Fotos in der Cloud zu organisieren und zu verwalten. Außerdem dient es mir als Backup meiner Fotos und Videos. Immich die open-source-Selfhosted-Foto- und Video-Plattform, die mich völlig überzeugt hat und jeden Tag bei mir im Einsatz ist.
Es gibt all die Funktionen, die man von den großen Cloud-Anbietern kennt, aber ohne den bitteren Beigeschmack, dass ich eigentlich nicht weiß, was Google und co. sonst noch so mit meinen Daten machen.
Das Projekt ist in ständiger Weiterentwicklung, es kommen teilweise täglich, neue Updates und Features hinzu und da es Open-Source ist, kann ich mich auch daran beteiligen und neue Features entwickeln oder vorschlagen.
Die Installation ist mit Docker ziemlich schnell gemacht, also legen wir los.
Anleitung getestet mit v1.133.1
Versionierung
| Datum | Änderung |
|---|---|
| 11-02-2025 | Initialer Release |
| 26-05-2025 | Anpassungen an Version 1.133.1 |
2. Voraussetzungen
Bevor wir starten, stellt sicher, dass folgende Voraussetzungen erfüllt sind:
3. Projektverzeichnis erstellen
Beginnen wir damit, ein Projektverzeichnis zu erstellen, in dem alle Konfigurationsdateien liegen:
mkdir /opt/containers/immich
cd /opt/containers/immich
4. Projektdateien erstellen
Wir laden uns die aktuellste Verion der .env herunter.
wget -O .env https://github.com/immich-app/immich/releases/latest/download/example.envPasse die .env entsprechend an, kannst zb. mit UPLOAD_LOCATION wählen wo deine Fotos gespeichert werden sollen.
TZ= (Timezone) solltest du auf Europe/Berlin setzen
Außerdem müssen wir die docker-compose.yml noch erstellen
nano docker-compose.yml
name: immich

services:
  immich-server:
    container_name: immich_server
    image: ghcr.io/immich-app/immich-server:${IMMICH_VERSION:-release}
    # extends:
    #   file: hwaccel.transcoding.yml
    #   service: cpu # set to one of [nvenc, quicksync, rkmpp, vaapi, vaapi-wsl] for accelerated transcoding
    volumes:
      # Do not edit the next line. If you want to change the media storage location on your system, edit the value of UPLOAD_LOCATION in the .env file
      - ${UPLOAD_LOCATION}:/usr/src/app/upload
      - /etc/localtime:/etc/localtime:ro
    env_file:
      - .env
    ports:
      - '2283:2283'
    depends_on:
      - redis
      - database
    labels:
      - "traefik.enable=true"
      - "traefik.http.routers.immich.entrypoints=websecure"
      - "traefik.http.routers.immich.rule=(Host(`immich.deinedomain.de`))"
      - "traefik.http.routers.immich.tls=true"
      - "traefik.http.routers.immich.tls.certresolver=cloudflare"
      - "traefik.http.routers.immich.service=immich"
      - "traefik.http.services.immich.loadbalancer.server.port=2283"
      - "traefik.docker.network=frontend"
    restart: unless-stopped
    networks:
      - immich
      - frontend
    healthcheck:
      disable: false

  immich-machine-learning:
    container_name: immich_machine_learning
    # For hardware acceleration, add one of -[armnn, cuda, openvino] to the image tag.
    # Example tag: ${IMMICH_VERSION:-release}-cuda
    image: ghcr.io/immich-app/immich-machine-learning:${IMMICH_VERSION:-release}
    # extends: # uncomment this section for hardware acceleration - see https://immich.app/docs/features/ml-hardware-acceleration
    #   file: hwaccel.ml.yml
    #   service: cpu # set to one of [armnn, cuda, openvino, openvino-wsl] for accelerated inference - use the `-wsl` version for WSL2 where applicable
    volumes:
      - model-cache:/cache
    env_file:
      - .env
    restart: always
    healthcheck:
      disable: false
    networks:
      - immich

  redis:
    container_name: immich_redis
    image: docker.io/redis:6.2-alpine@sha256:eaba718fecd1196d88533de7ba49bf903ad33664a92debb24660a922ecd9cac8
    healthcheck:
      test: redis-cli ping || exit 1
    restart: always
    networks:
      - immich

  database:
    container_name: immich_postgres
    image: ghcr.io/immich-app/postgres:14-vectorchord0.3.0-pgvectors0.2.0
    environment:
      POSTGRES_PASSWORD: ${DB_PASSWORD}
      POSTGRES_USER: ${DB_USERNAME}
      POSTGRES_DB: ${DB_DATABASE_NAME}
      POSTGRES_INITDB_ARGS: '--data-checksums'
    volumes:
      # Do not edit the next line. If you want to change the database storage location on your system, edit the value of DB_DATA_LOCATION in the .env file
      - ${DB_DATA_LOCATION}:/var/lib/postgresql/data
    restart: always
    networks:
      - immich

volumes:
  model-cache:

networks:
  frontend:
    external: true
  immich:
Hier müssen wir noch die Domain anpassen: - "traefik.http.routers.immich.rule=(Host(immich.deinedomain.de))"
5. Container starten
Jetzt können wir den Container starten
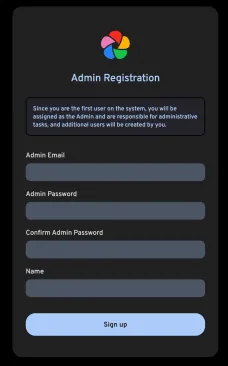
docker compose up -dWenn alles geklappt hat, sollte dich auf deiner immich-Domain der Login-Screen begrüßen, hier kannst du dir initial ein Admin-Konto anlegen.
6. App installieren
Jetzt kannst du dir die Imich-App auf dein Smartphone laden und deine Fotos synchronisieren.”
Quellen:

[ˌtuːˌtæpˈtoːbi]